
Create, send and close an RFI
Use FieldNovi’s Contractor Edition to send a clear Request for Information, collect responses through individual secure links, review the answers and share the final approved report. Recipients can respond without creating a FieldNovi account. The app has six stages; this walkthrough breaks them into practical steps and also covers markup, the recipient experience, the RFI register and search.
- 1 · RFI details and question
- 2 · Photos and drawings
- 3 · Recipients and send
- 4 · Review and accept responses
- 5 · Final resolution and report
- 6 · Approve and close
Before you begin
Sign in, switch to the correct Contractor Edition workspace and open the project. Have your question, drawing references, optional photos or snapshots, and recipient email addresses ready. The screenshots use a demonstration RFI; your project names, dates and recipients will differ.
Use the save buttons as you work: these RFI forms do not auto-save. Saving a draft or preparing invitations does not send them. Accepting a response does not close the RFI. Final approval freezes the completed report, so review the question, selected images, resolution and distribution list before closing.
- Request a response
- Send the question to other people, collect their answers and review them before final approval.
- Enter an existing solution
- Record a known answer and close the RFI without issuing response invitations.
- Recipient roles
- Required responders must answer before closure unless their requirement is formally waived. Optional contributors may respond. FYI recipients have read-only access.
- Final report and RFI log
- The approved PDF is the retained record for one completed RFI. The project register provides a live list that you can filter and export as a PDF or Excel log.
STEP 1 OF 13
Open your project and start a new RFI
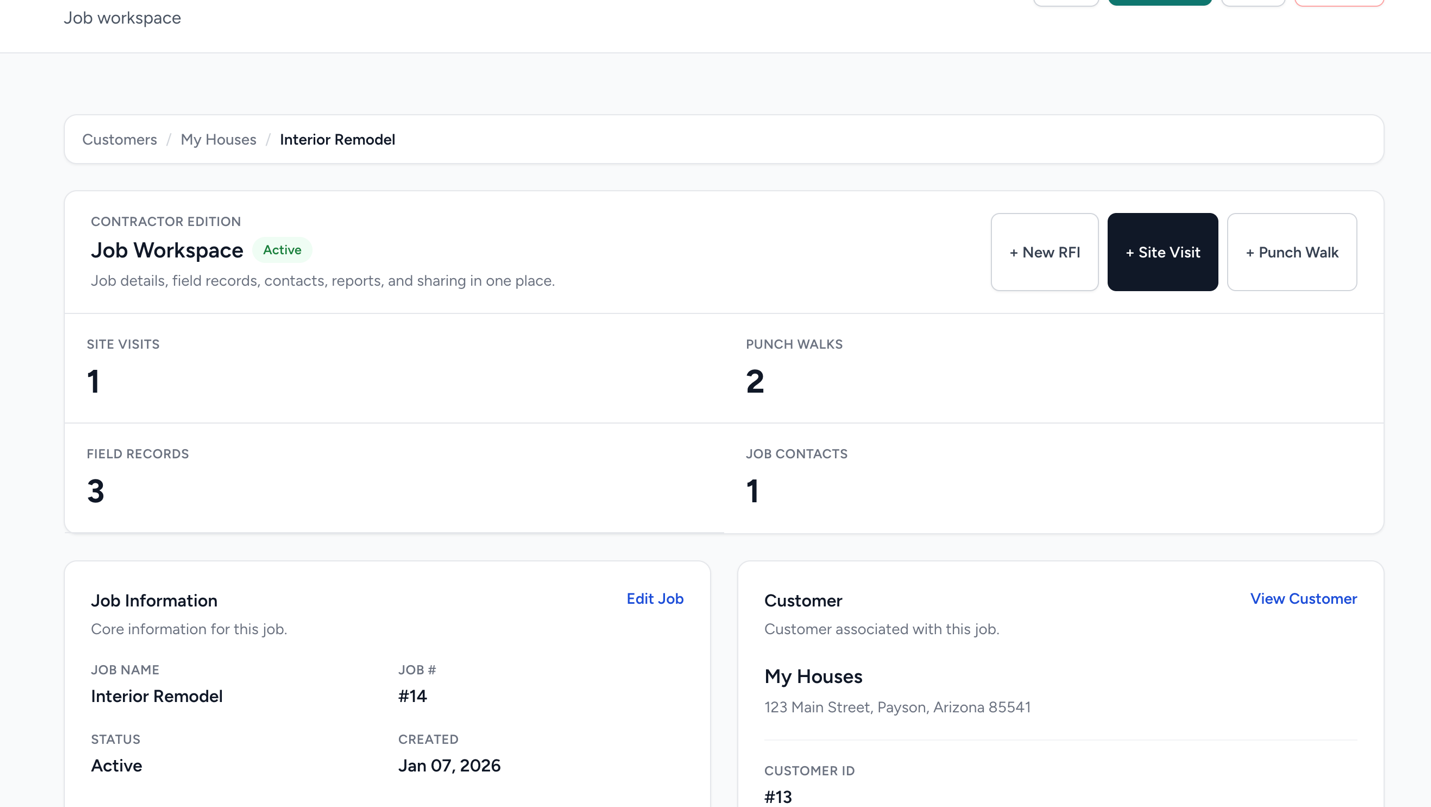
From your Contractor Edition workspace, open the project you want to work on. In the Job Workspace, select + New RFI.
Check the project breadcrumb before entering information so the RFI belongs to the correct job.
STEP 2 OF 13
App Step 1 — Enter the details and question
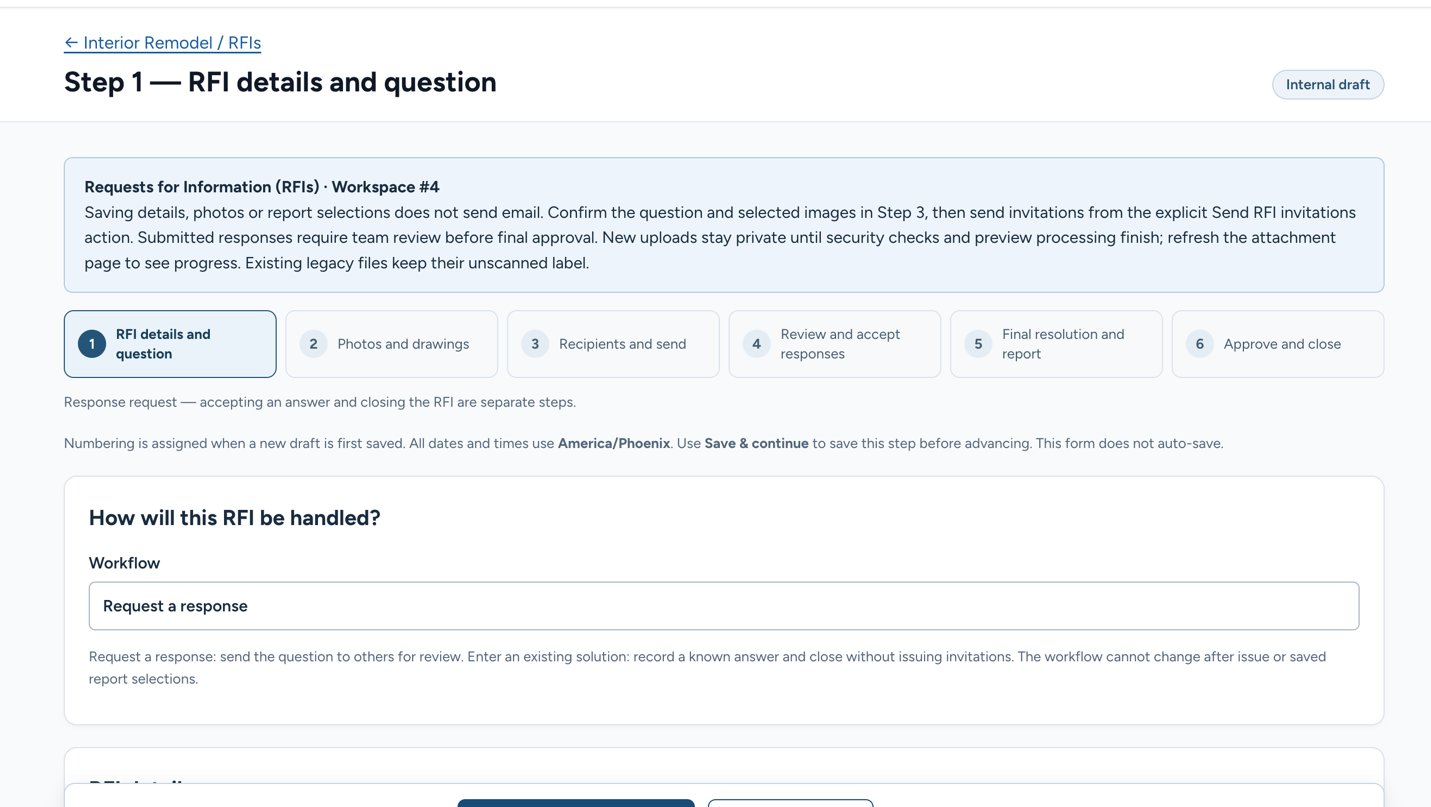
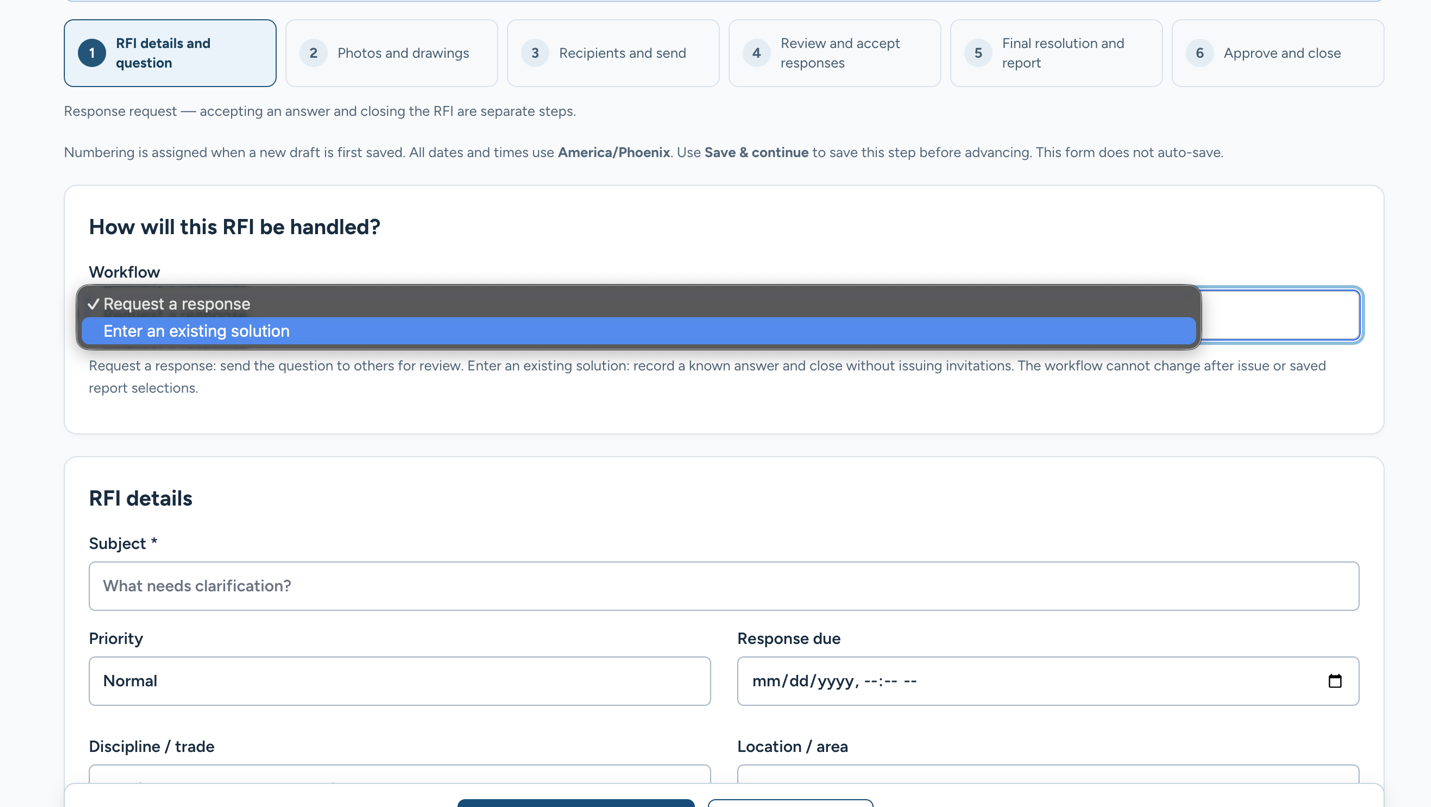
- Under Workflow, choose Request a response to send a question for review. Choose Enter an existing solution when you already have the answer and do not need response invitations. The remaining invitation and response steps in this guide describe Request a response.
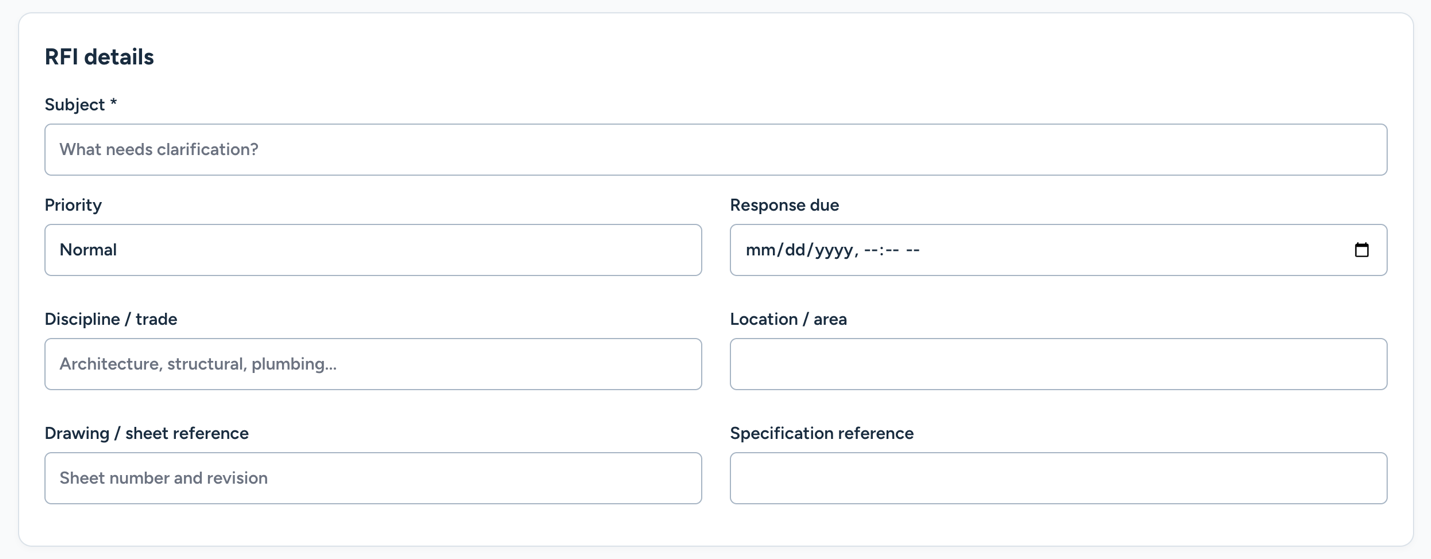
- Enter a clear Subject. Set the priority and response due date, then add the discipline or trade, location, drawing or sheet reference, and specification reference as needed.
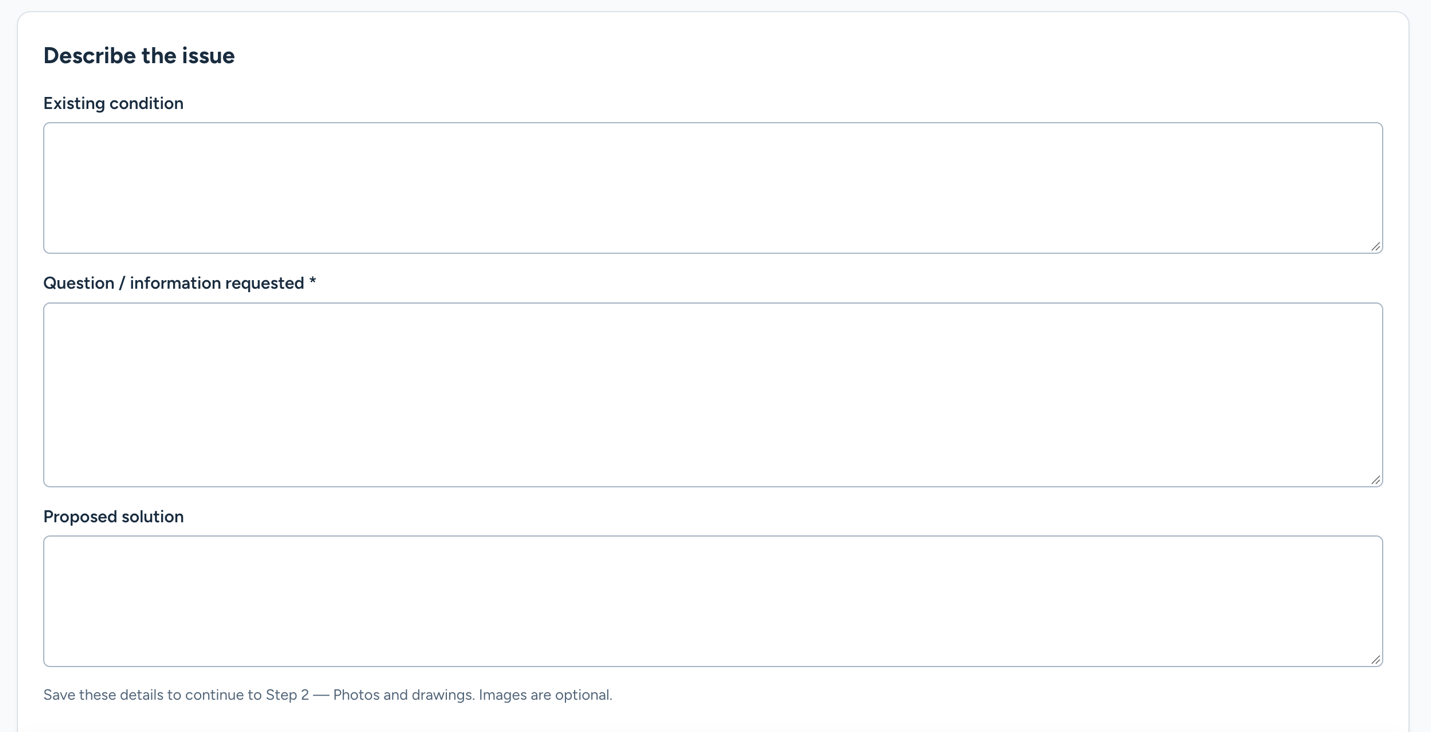
- Describe the existing condition and complete Question / information requested. Add a proposed solution if you have one. Explain exactly what you need the reviewer to clarify.
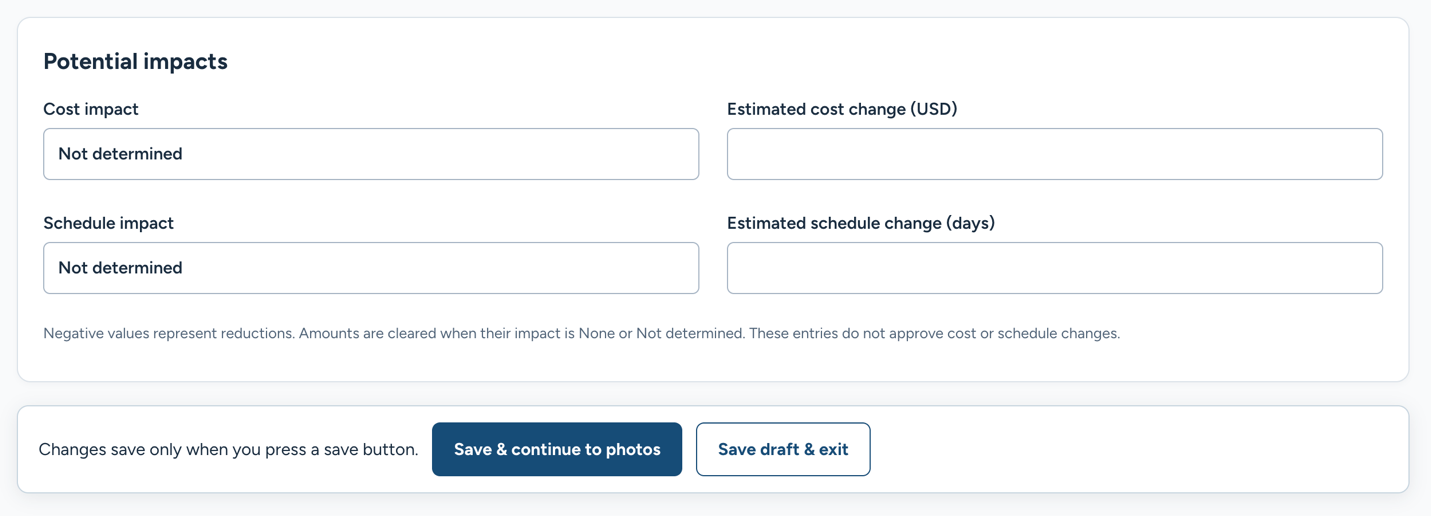
- Record potential cost and schedule impacts, including estimates when appropriate. These entries do not approve cost or schedule changes.
- Select Save & continue to photos, or use Save draft & exit to return later.
The RFI number is assigned when a new draft is first saved. Dates and times shown in this workflow use America/Phoenix. The workflow cannot change after issue or after report selections have been saved.
Helpful tip Save before leaving a step. Typing into a field alone does not save the RFI.
STEP 3 OF 13
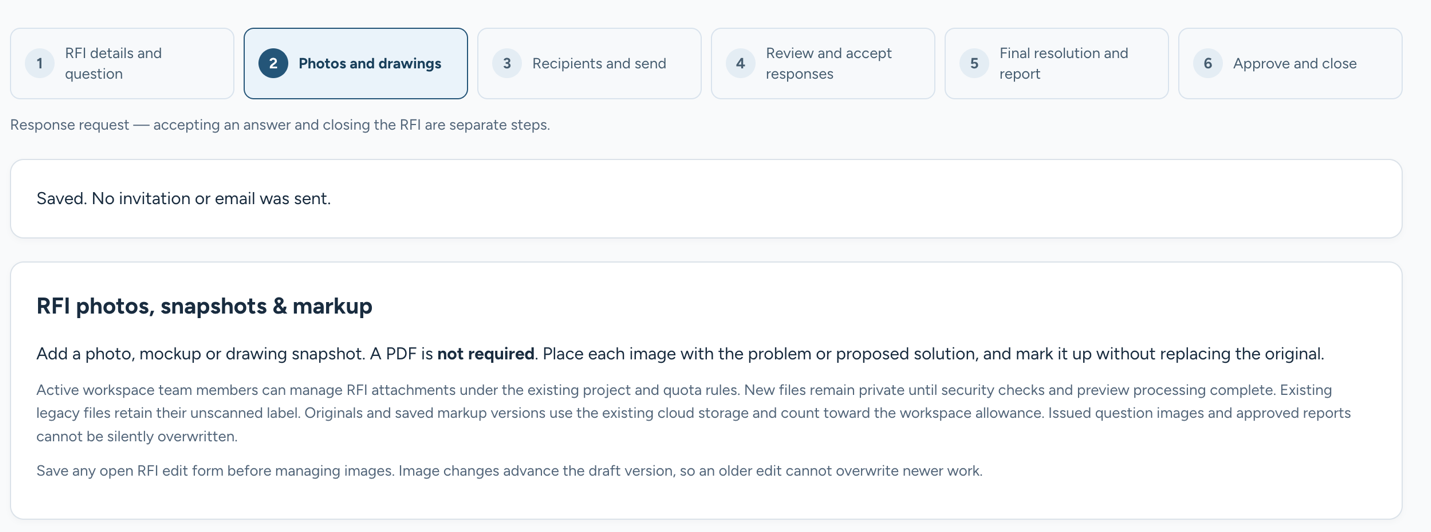
App Step 2 — Add photos and drawing snapshots
Photos are optional, and a PDF is not required. A clear photo or drawing snapshot can help the reviewer understand the question.
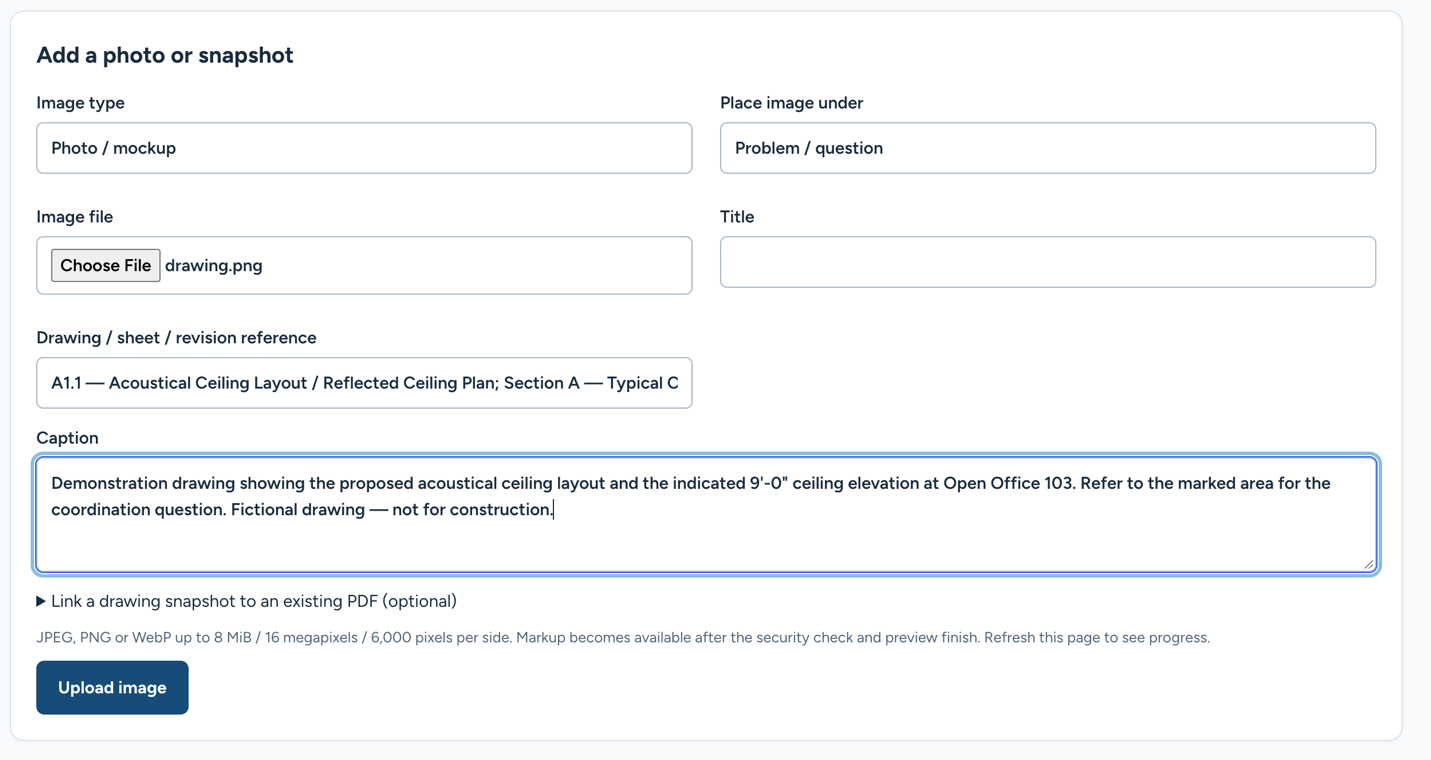
- Choose the Image type and where to place it, such as Problem / question.
- Select the image file and add its title, drawing or sheet reference, and a useful caption.
- Select Upload image. New files remain private while security checks and preview processing finish.
- Refresh the page to check progress. Wait for the image to become ready before selecting it for sharing or opening the markup tools.
The upload form supports JPEG, PNG and WebP images within the limits displayed on the page. The example form allows up to 8 MiB, 16 megapixels and 6,000 pixels per side.
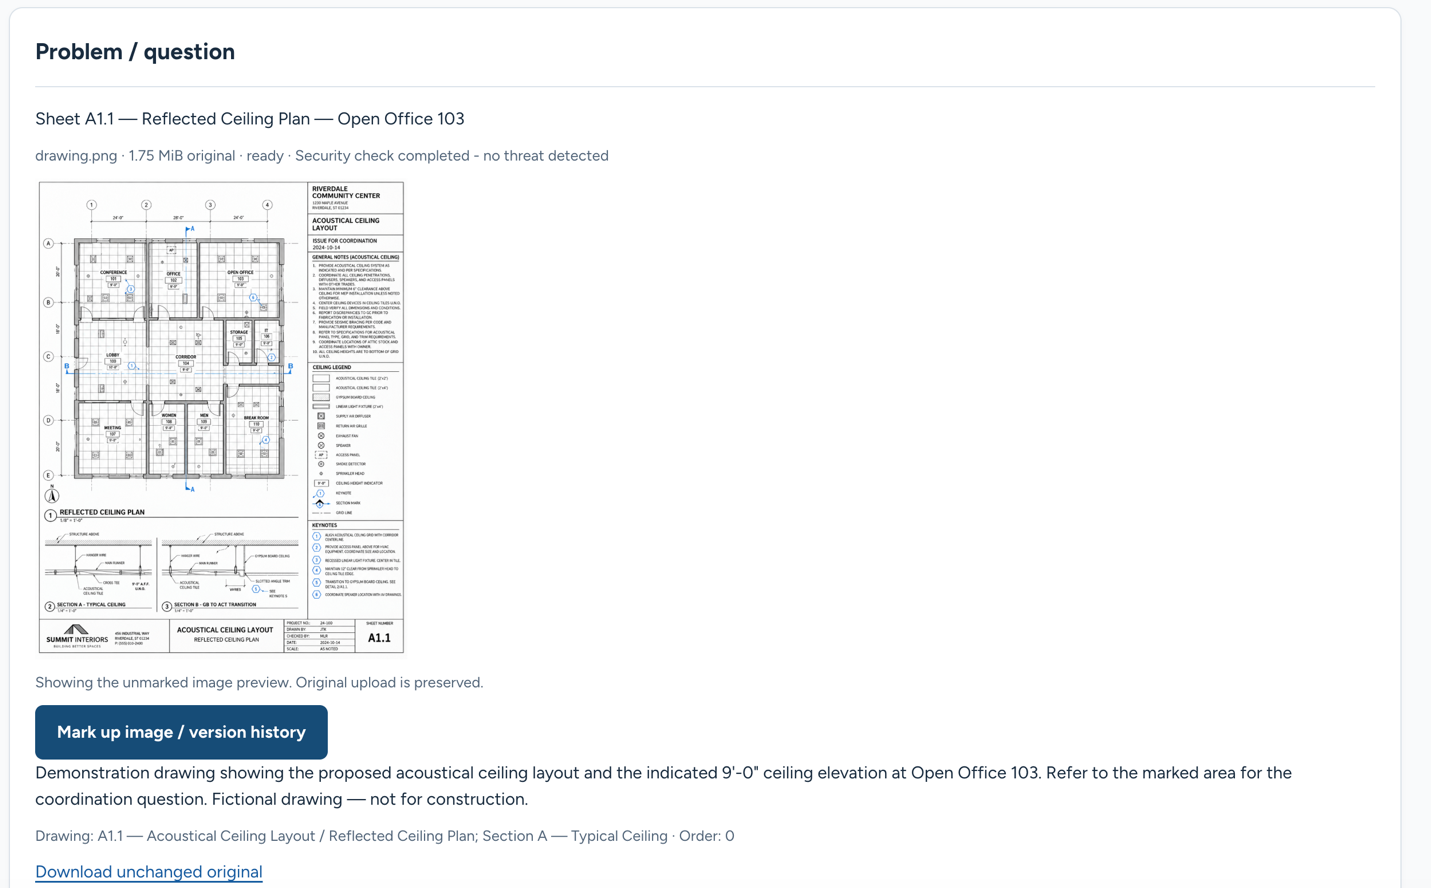
Helpful tip Save any open RFI edits before managing images. Image changes advance the draft version, which protects newer work from an older edit.
STEP 4 OF 13
Highlight the question and save a markup version
- Under a ready image, select Mark up image / version history.
- Use the tools to add arrows, lines, rectangles, circles, revision clouds, text, freehand marks or highlights. Adjust color, line width, text size and zoom as needed.
- Select Save new markup version. FieldNovi retains the original file and saves markup versions separately.
- Use Saved versions to view a saved rendering, reopen a version for editing, or choose the original while keeping the markup history.
- Use the back link with the left arrow at the top to return to the RFI photos. Review the images, then select Continue to recipients.
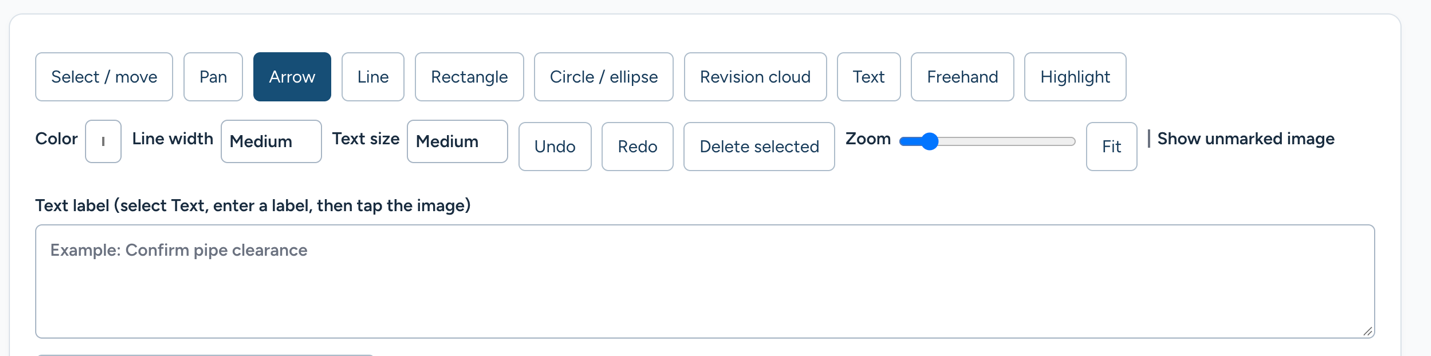
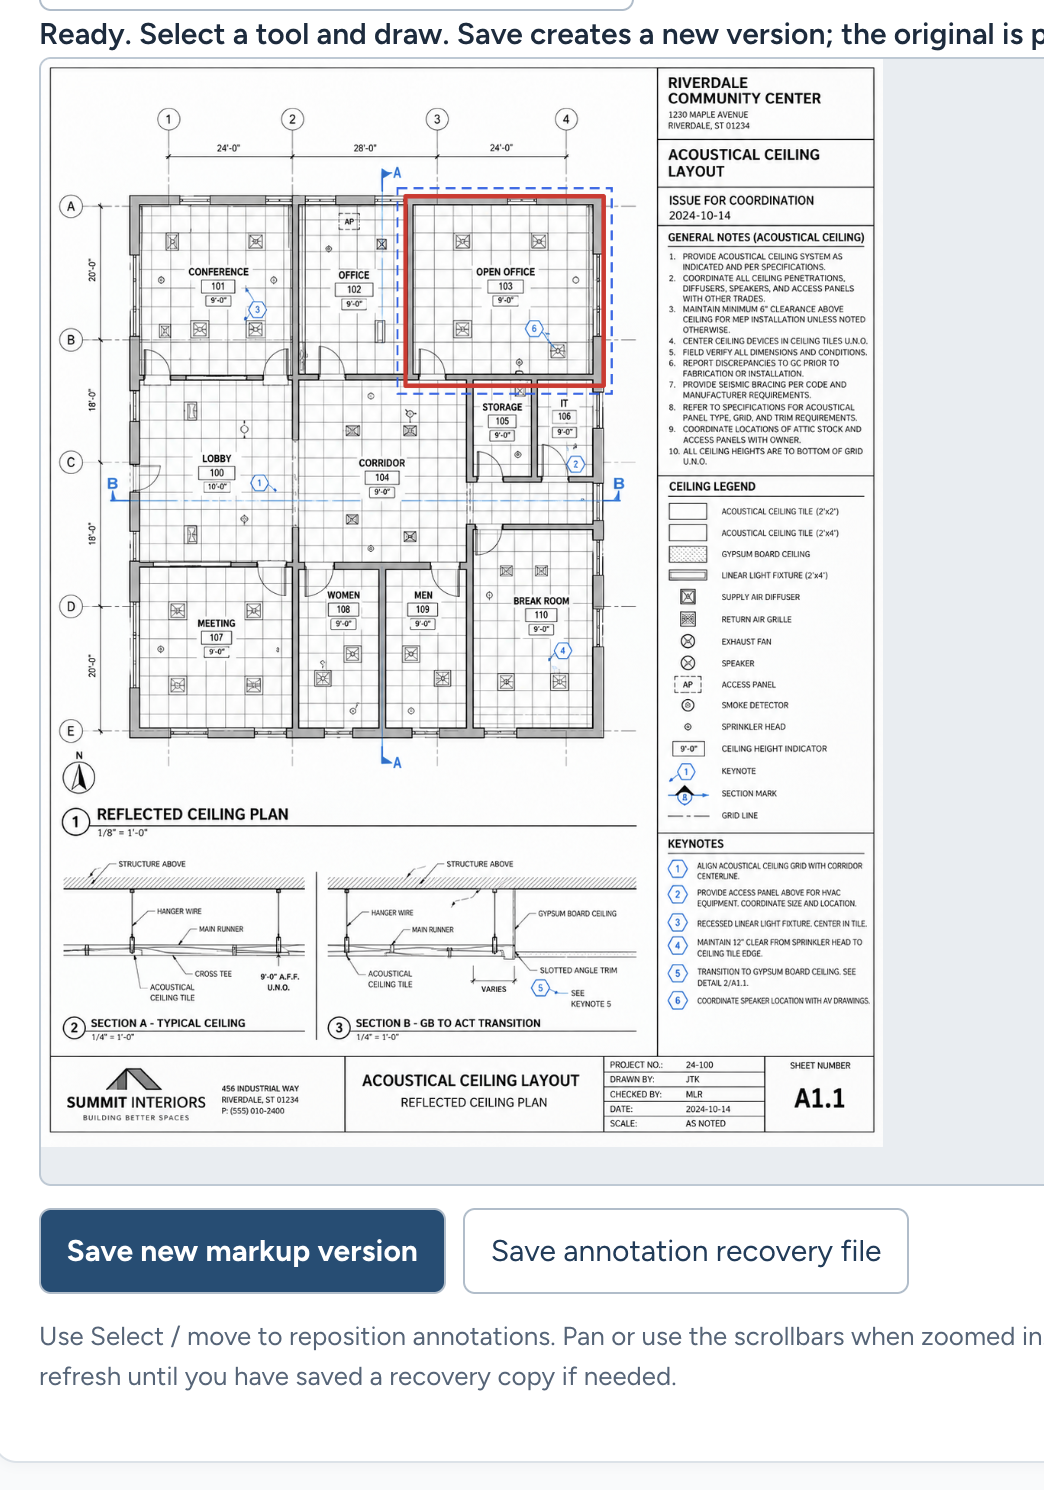
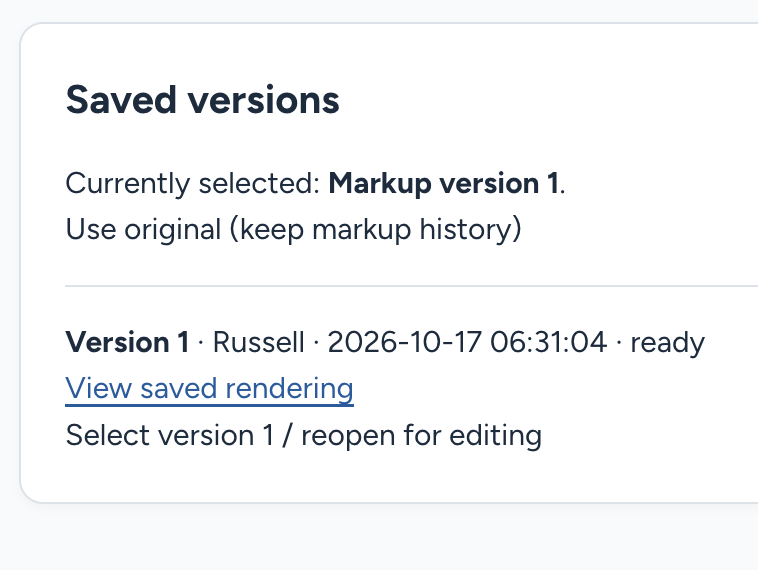
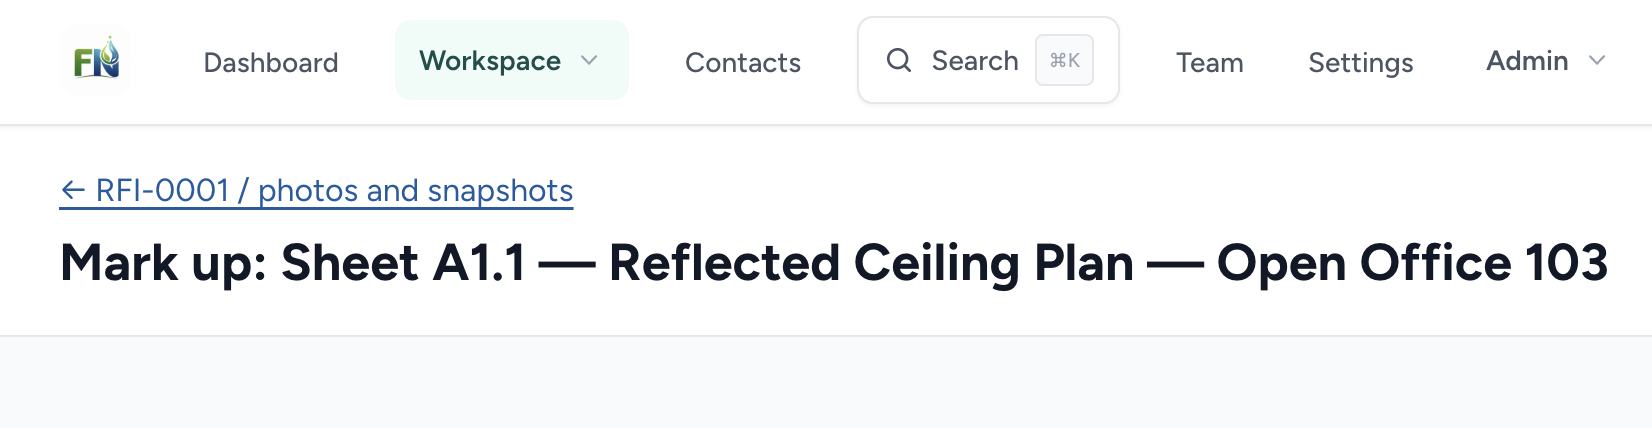
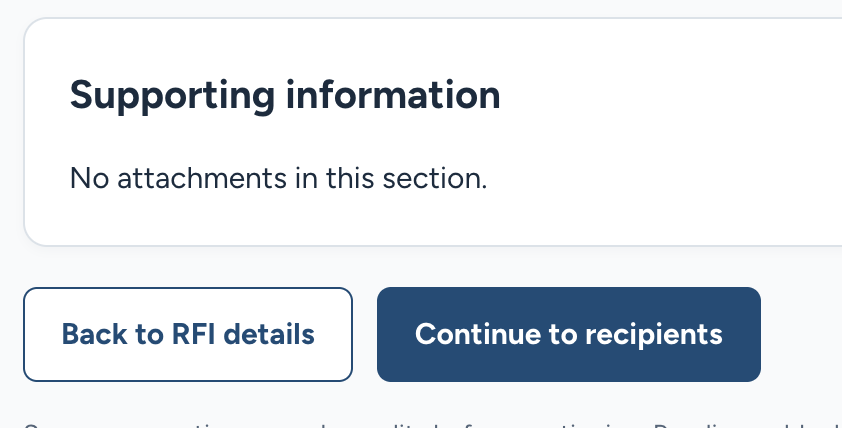
Helpful tip Keep the markup focused on the area that needs clarification. Save the new version before leaving the editor.
STEP 5 OF 13
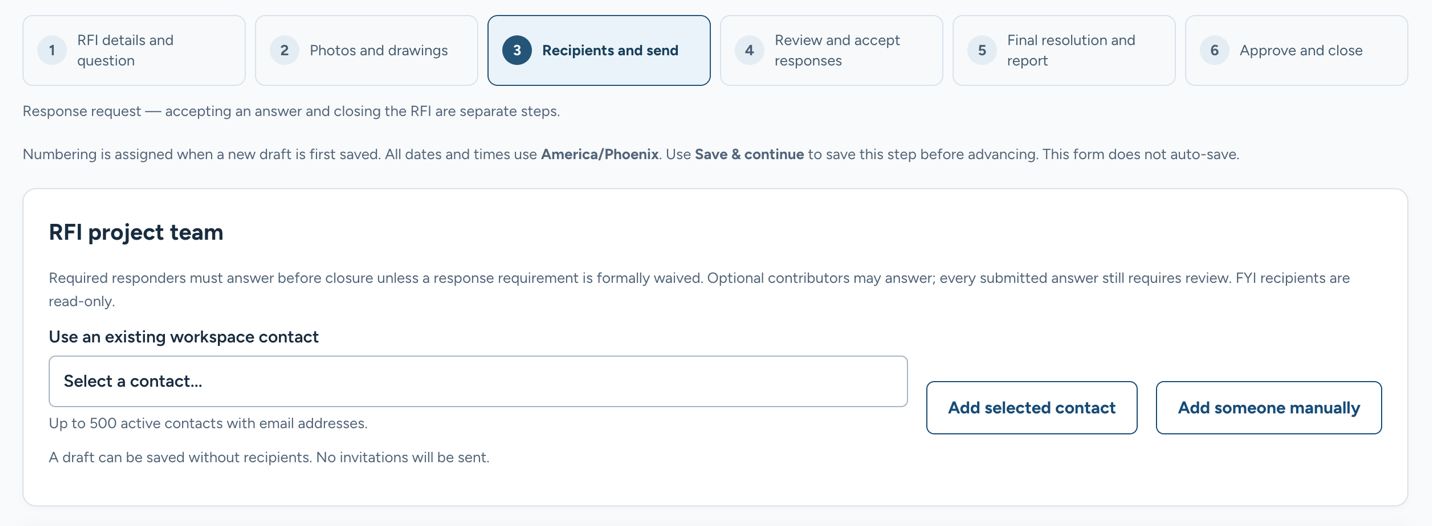
App Step 3 — Choose the people involved
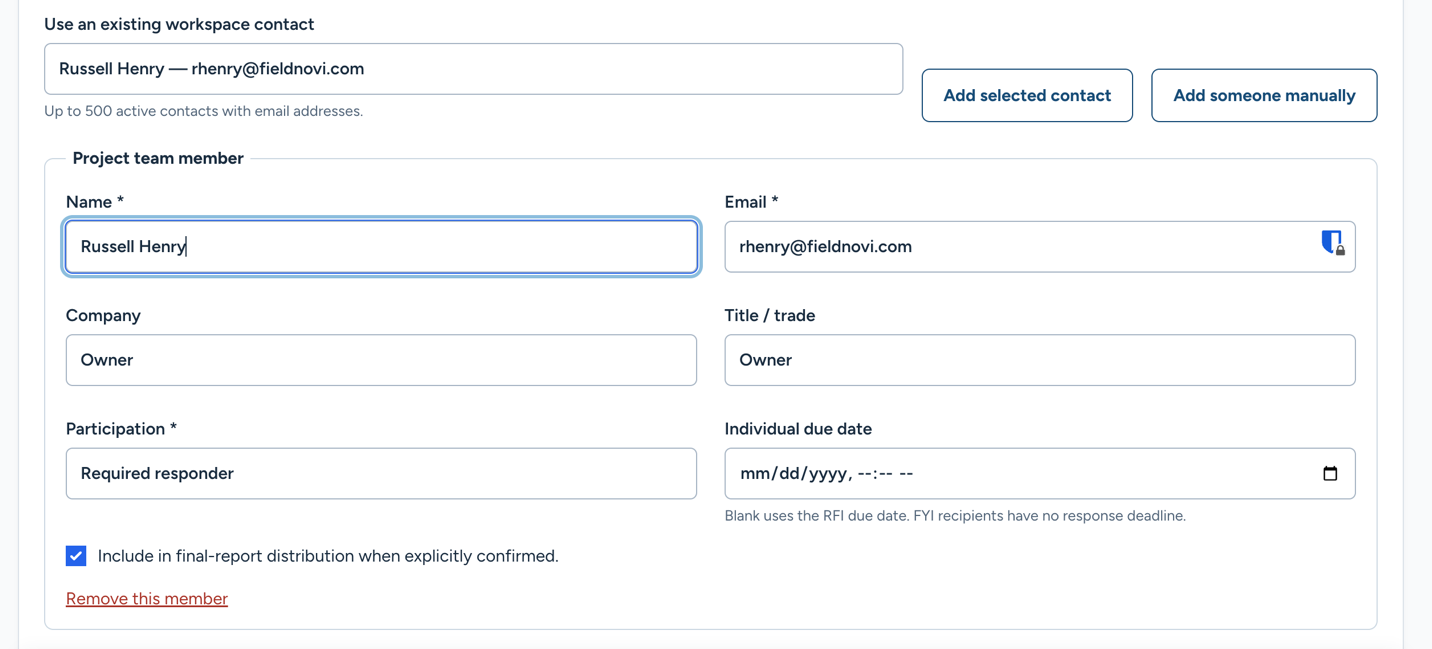
- Choose a workspace contact and select Add selected contact, or select Add someone manually.
- Check the person’s name, email, company and title or trade.
- Set Participation: required responder, optional contributor or FYI recipient. Only people who are allowed to respond can submit an answer.
- Set an individual due date when needed. If blank, the RFI due date is used; FYI recipients have no response deadline.
- Choose whether to include the person in final-report distribution when that distribution is explicitly confirmed.
- Select Save recipients & review RFI.
A draft may be saved without recipients. That does not send invitations.

STEP 6 OF 13
Review the issued question and send invitations
- Review the saved RFI question, recipient addresses and roles.
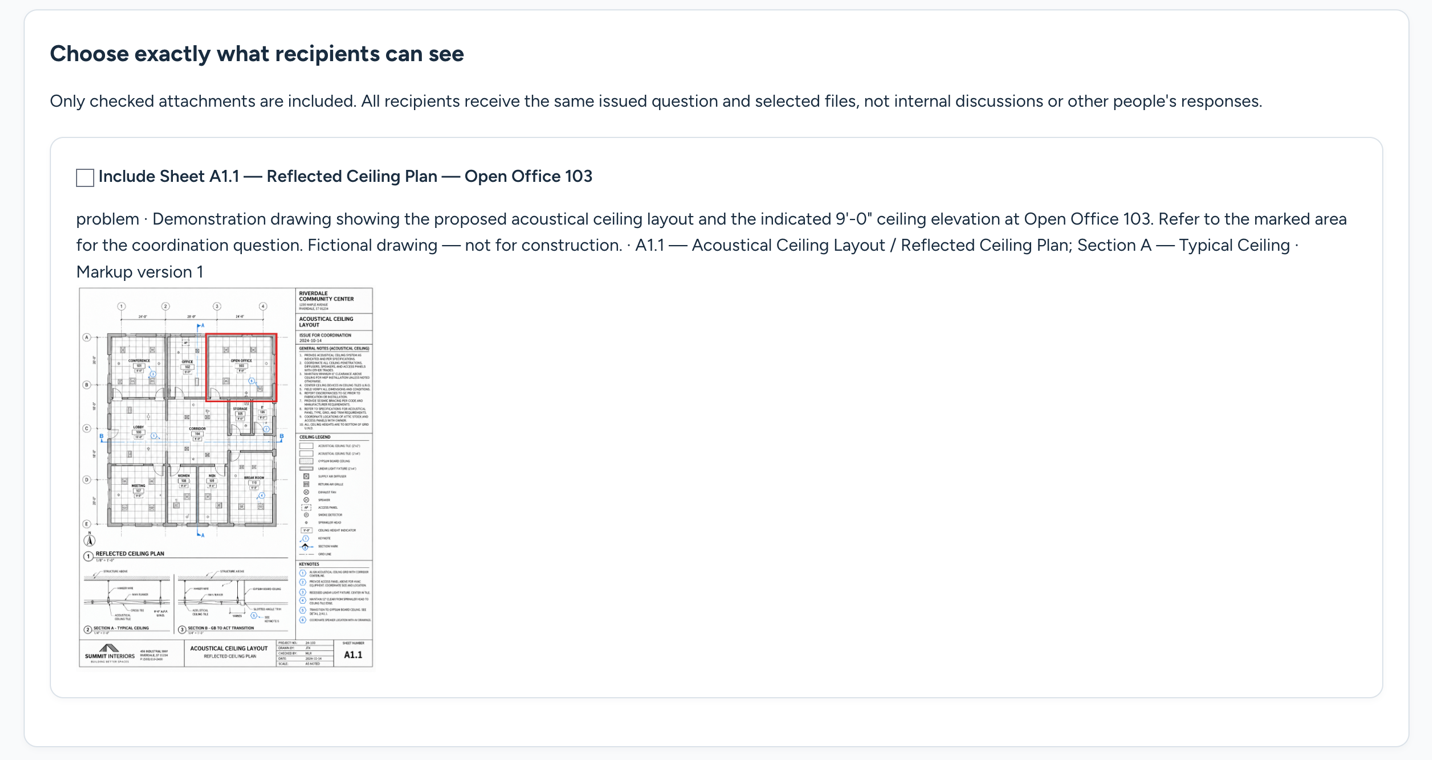
- Under Choose exactly what recipients can see, check each attachment you intend to share and verify the selected markup version. Only checked attachments are included.
- Select the review acknowledgment, then Confirm RFI & prepare invitations. This locks the issued version; it does not send email.
- On the invitations screen, select Send RFI invitations.
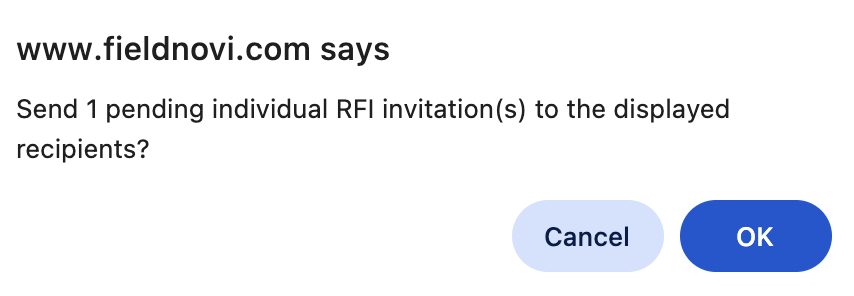
- Check the pending invitation count in the confirmation and select OK. Keep the page open until the sending results appear.
Each recipient receives an individual link. Recipients see the issued question and selected files, not internal discussions or other people’s responses. An issued question cannot be reopened; create a new draft if needed.

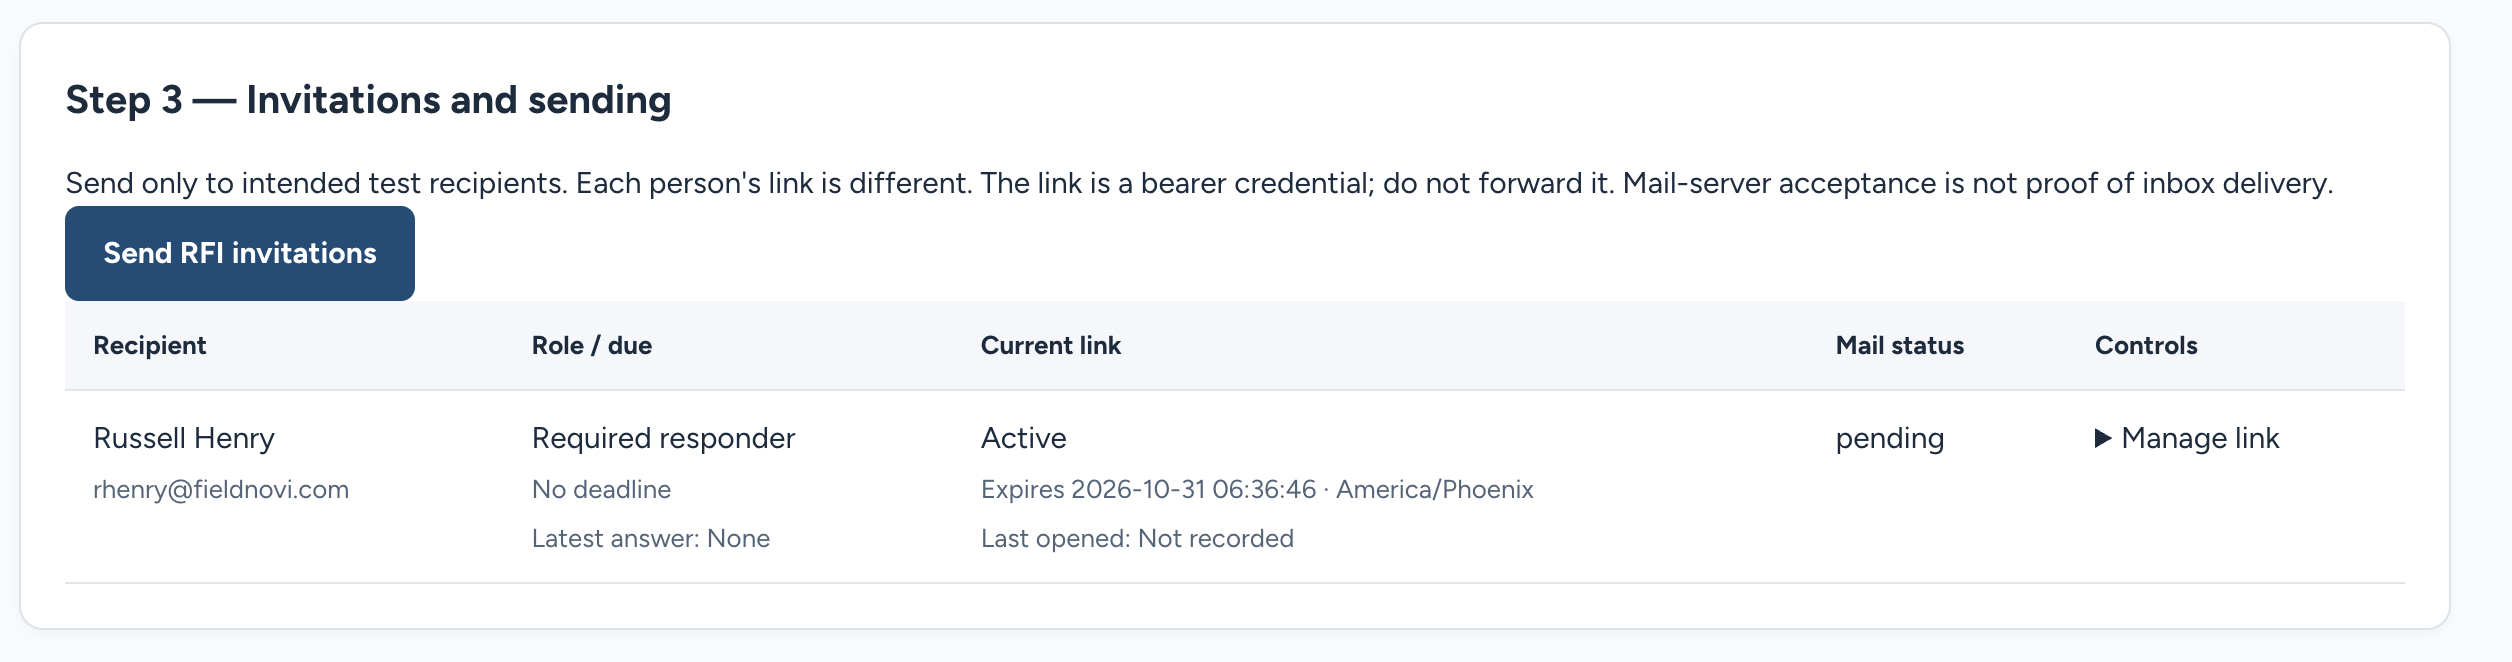
Helpful tip Send only to the intended recipients. Individual invitation links grant access to the RFI and should not be forwarded. A mail-server acceptance status does not confirm inbox delivery.
STEP 7 OF 13
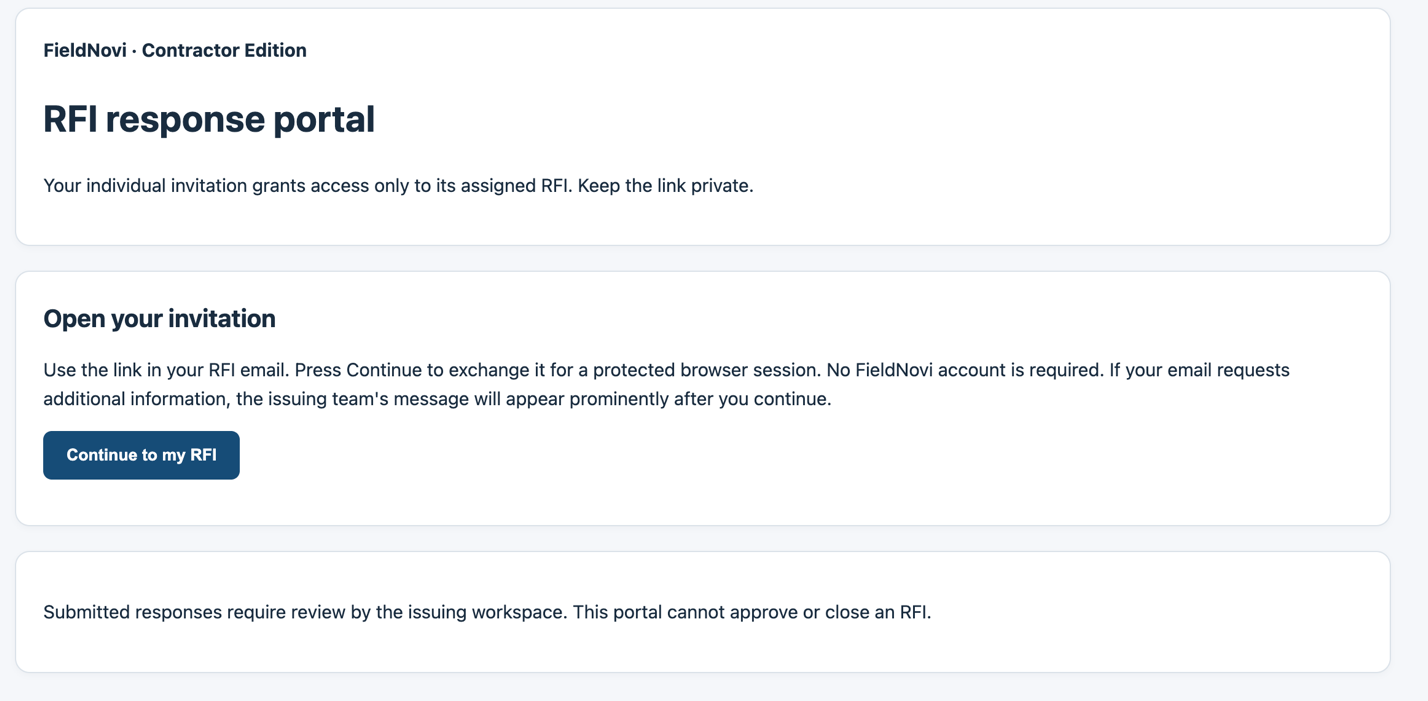
How recipients review and respond without a login
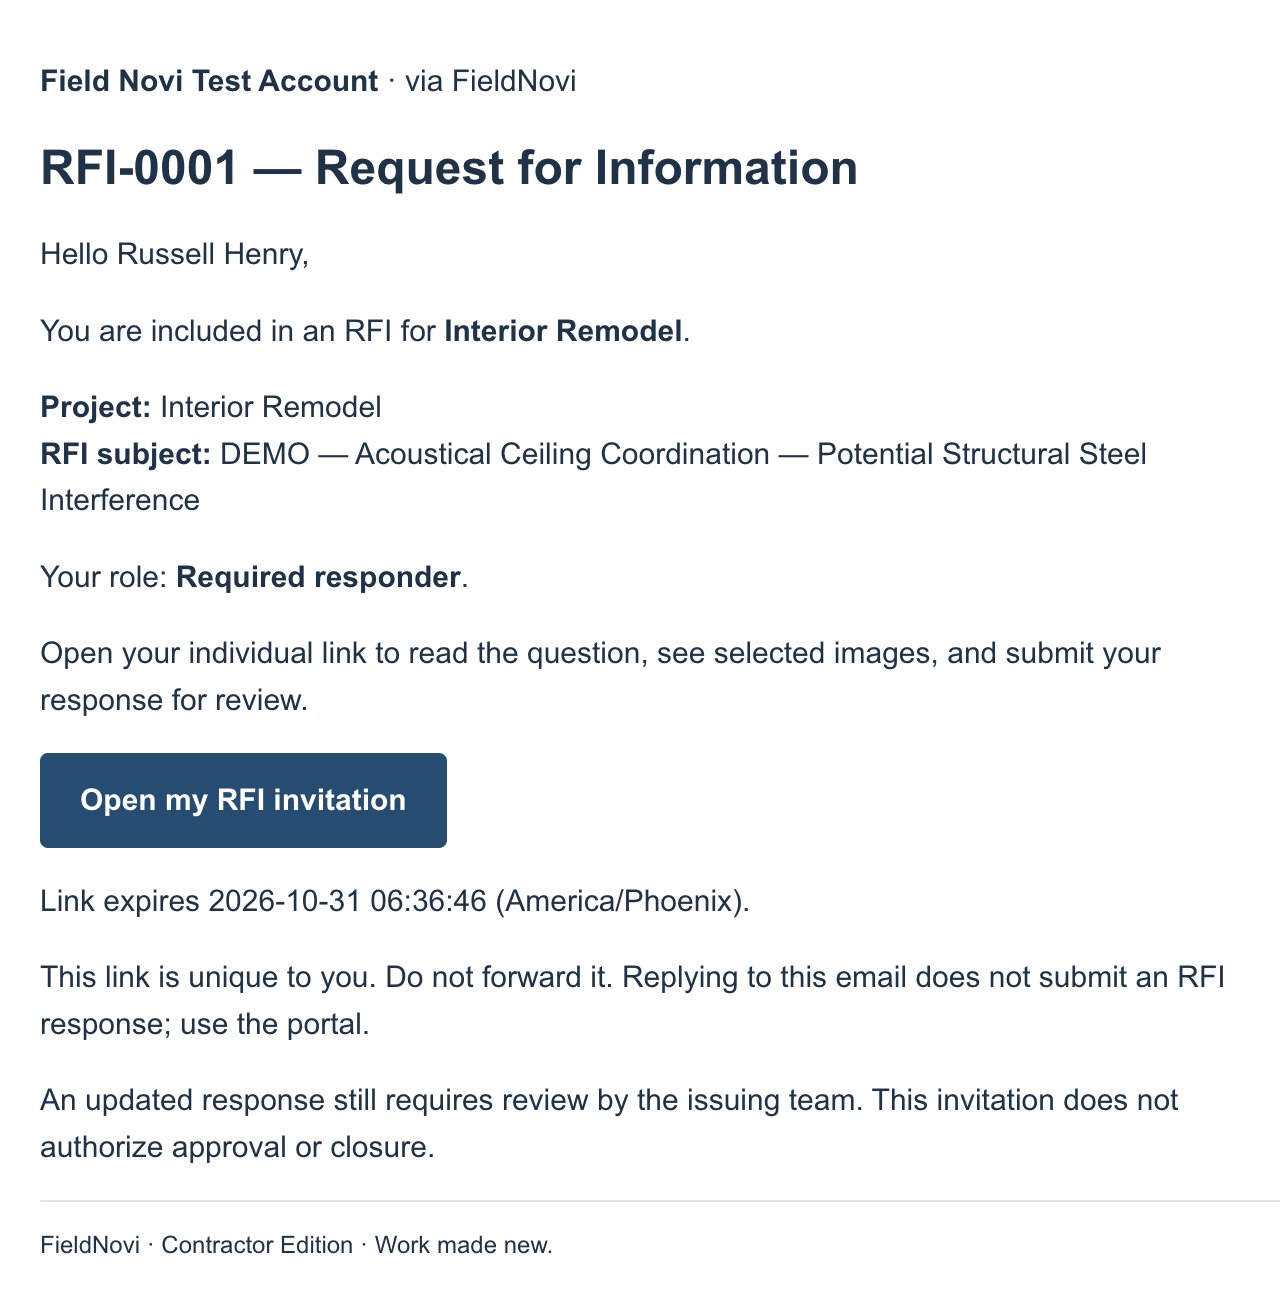
- The recipient opens the invitation email and selects Open my RFI invitation.
- On the response portal, they select Continue to my RFI. No FieldNovi account is required.
- They review the issued question and selected images, then enter a written response.
- They may attach up to three supported JPEG, PNG or WebP images and add captions. Each image may be up to 8 MiB and 16 megapixels. The portal does not support PDF uploads or recipient-side markup in this release.
- They select the required acknowledgments and then Submit response for review. They should keep the page open until confirmation appears.
Uploaded response images remain private while security checks and previews are prepared. Submitting a response does not approve or close the RFI. Replying to the invitation email does not submit an RFI response; the recipient must use the portal.
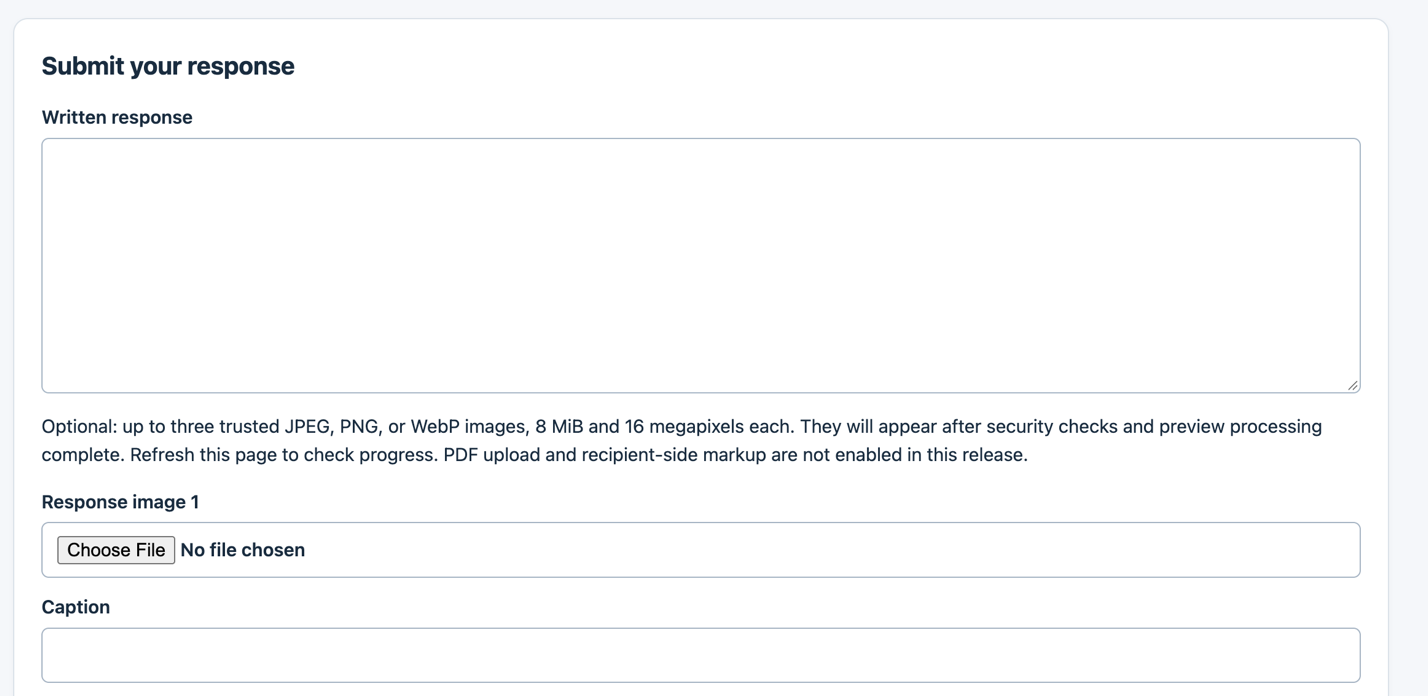

Helpful tip The response form does not auto-save. If submission fails, keep the tab open so the entered text and selected files remain available.
STEP 8 OF 13
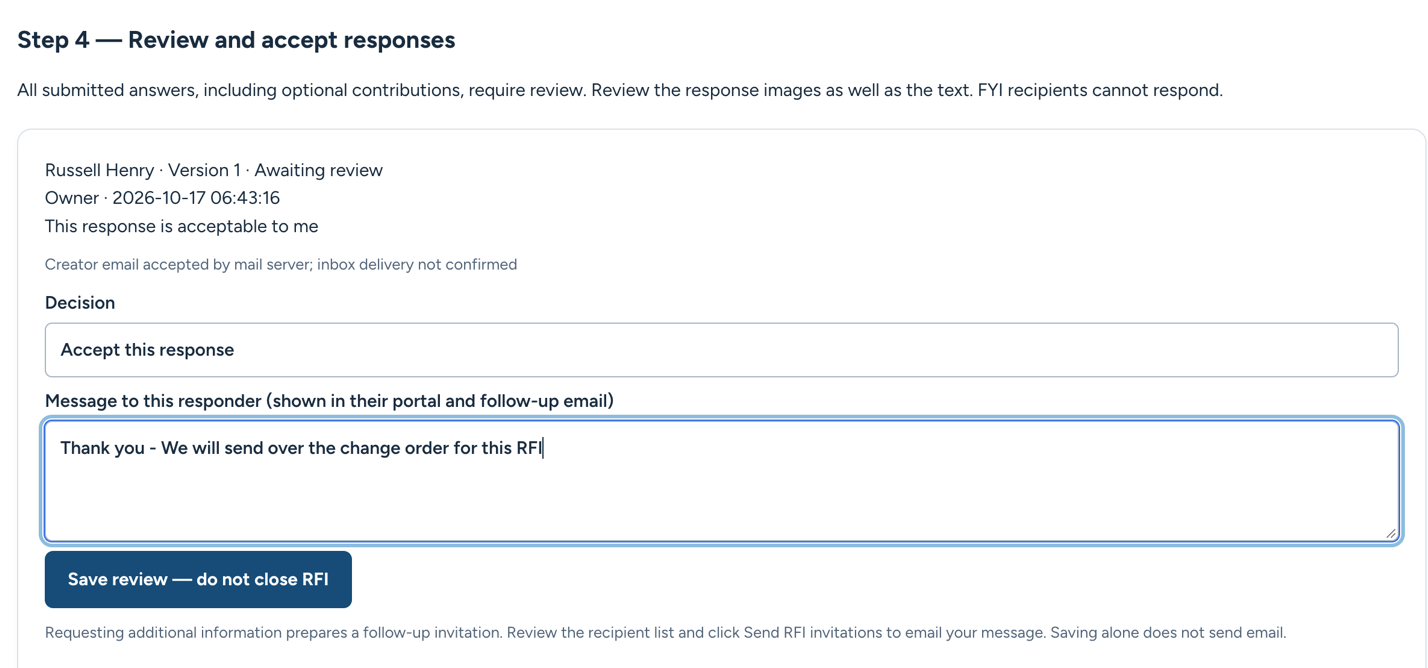
App Step 4 — Review each submitted answer
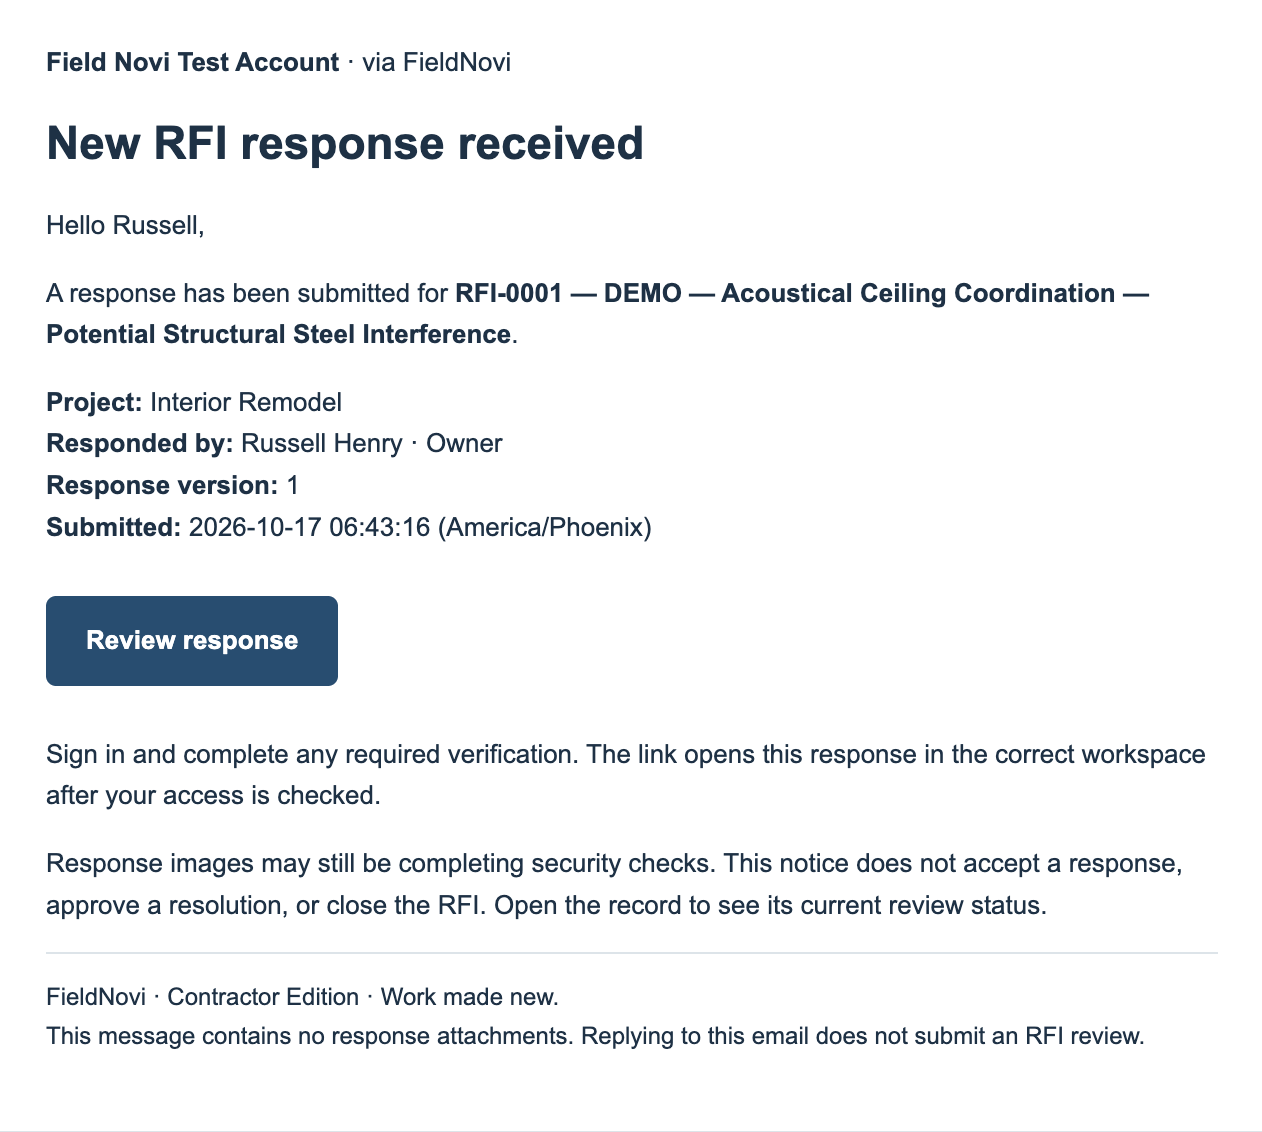
When a response is recorded, the RFI creator receives an email notification. Select Review response and sign in, completing any required verification. You can also open the RFI from its project.
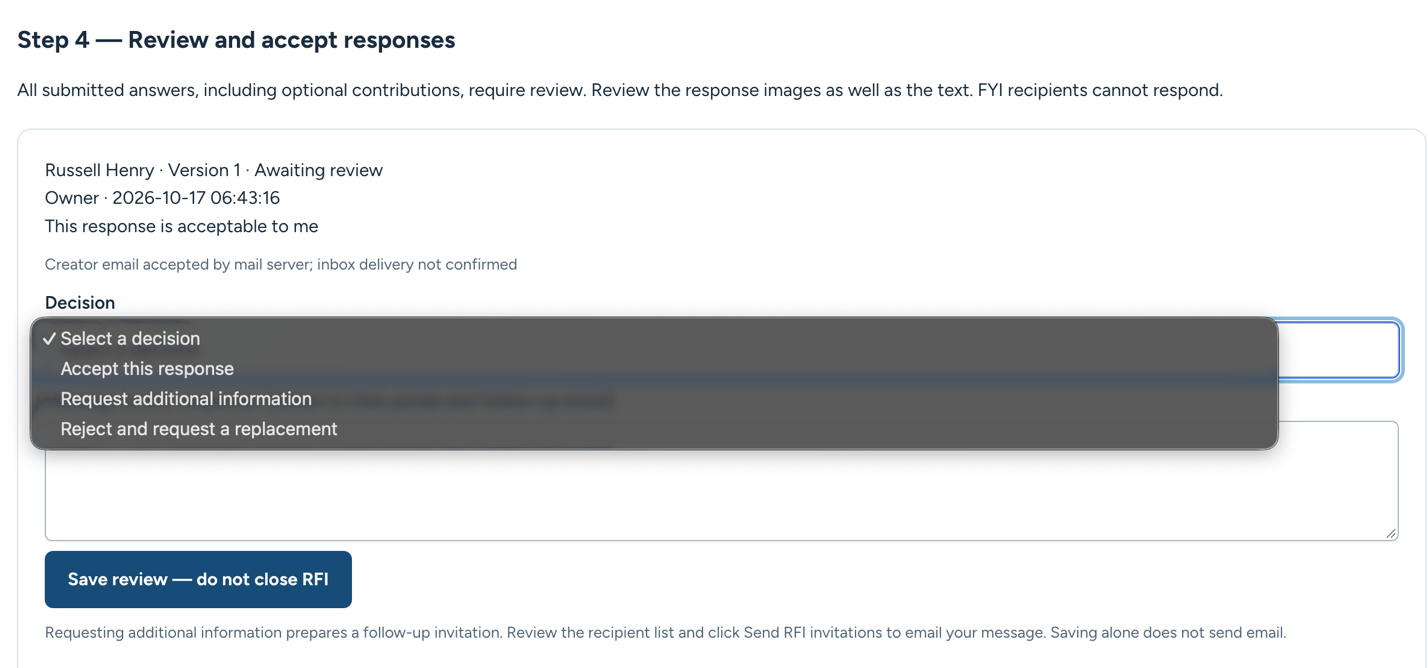
- Review the response text and its images. All submitted answers, including optional contributions, need review.
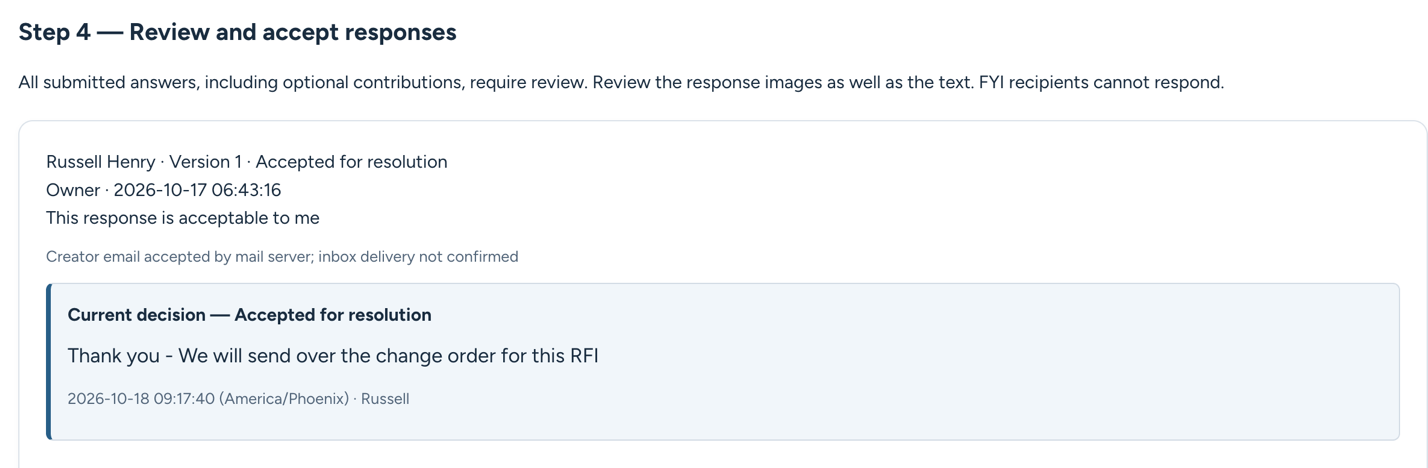
- Choose a decision: Accept this response, Request additional information, or Reject and request a replacement.
- Enter the message you want the responder to see in their portal and any follow-up email.
- Select Save review — do not close RFI.
An accepted response is marked Accepted for resolution. Acceptance does not close the RFI. When requesting additional information, review the prepared follow-up invitation and explicitly select Send RFI invitations; saving the review alone does not send email.
STEP 9 OF 13
App Step 5 — Review the final resolution and report
- Select Prepare final resolution & report.
- Check the response requirements and review the final resolution for accuracy. If including images from an accepted response, select the associated accepted source answer before selecting its images.
- Choose the report options. Include activity log at the end adds the RFI timeline. Include full-page image appendix adds larger page-fit copies of the selected images after the narrative.
- Save the report selections and review the draft PDF before moving to approval.
Preparing the final resolution does not approve, close or send the report. Leaving the activity log out of the PDF does not remove the internal history.

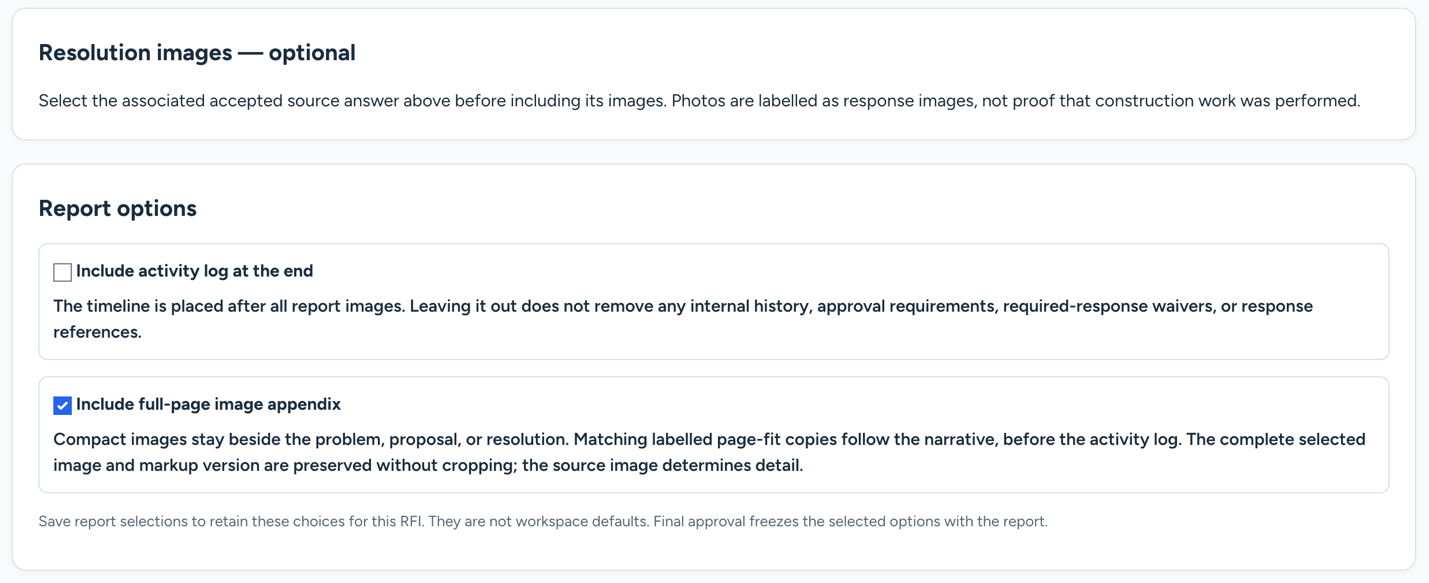
Helpful tip The full-page image appendix is helpful when recipients need to examine drawings or markup in more detail.
STEP 10 OF 13
App Step 6 — Confirm distribution and close the RFI
- Enable Automatically email the final approved PDF after successful completion if you want FieldNovi to distribute the completed report.
- Review the final-copy list, names and addresses. Select everyone who should receive the completed record, and choose whether to send yourself a copy.
- Set how many days the read-only report link should remain active. The example uses 30 days from the send attempt; choose the duration you need.
- Confirm that the selected addresses are authorized to receive the approved PDF, including its images and any activity log.
- Review the saved resolution, images and report options, then select the final approval acknowledgment.
- Select Approve, close & email final report. Keep the page open until completion and distribution results are shown.
Successful approval retains the final PDF and freezes the approved content and image versions. The completed path has no reopen or revision action. Individual response access is revoked when completion succeeds.
Reports up to 6 MiB are attached to individual emails. Larger PDFs use a read-only report link, and each email also includes a link. These report links do not accept new RFI responses.
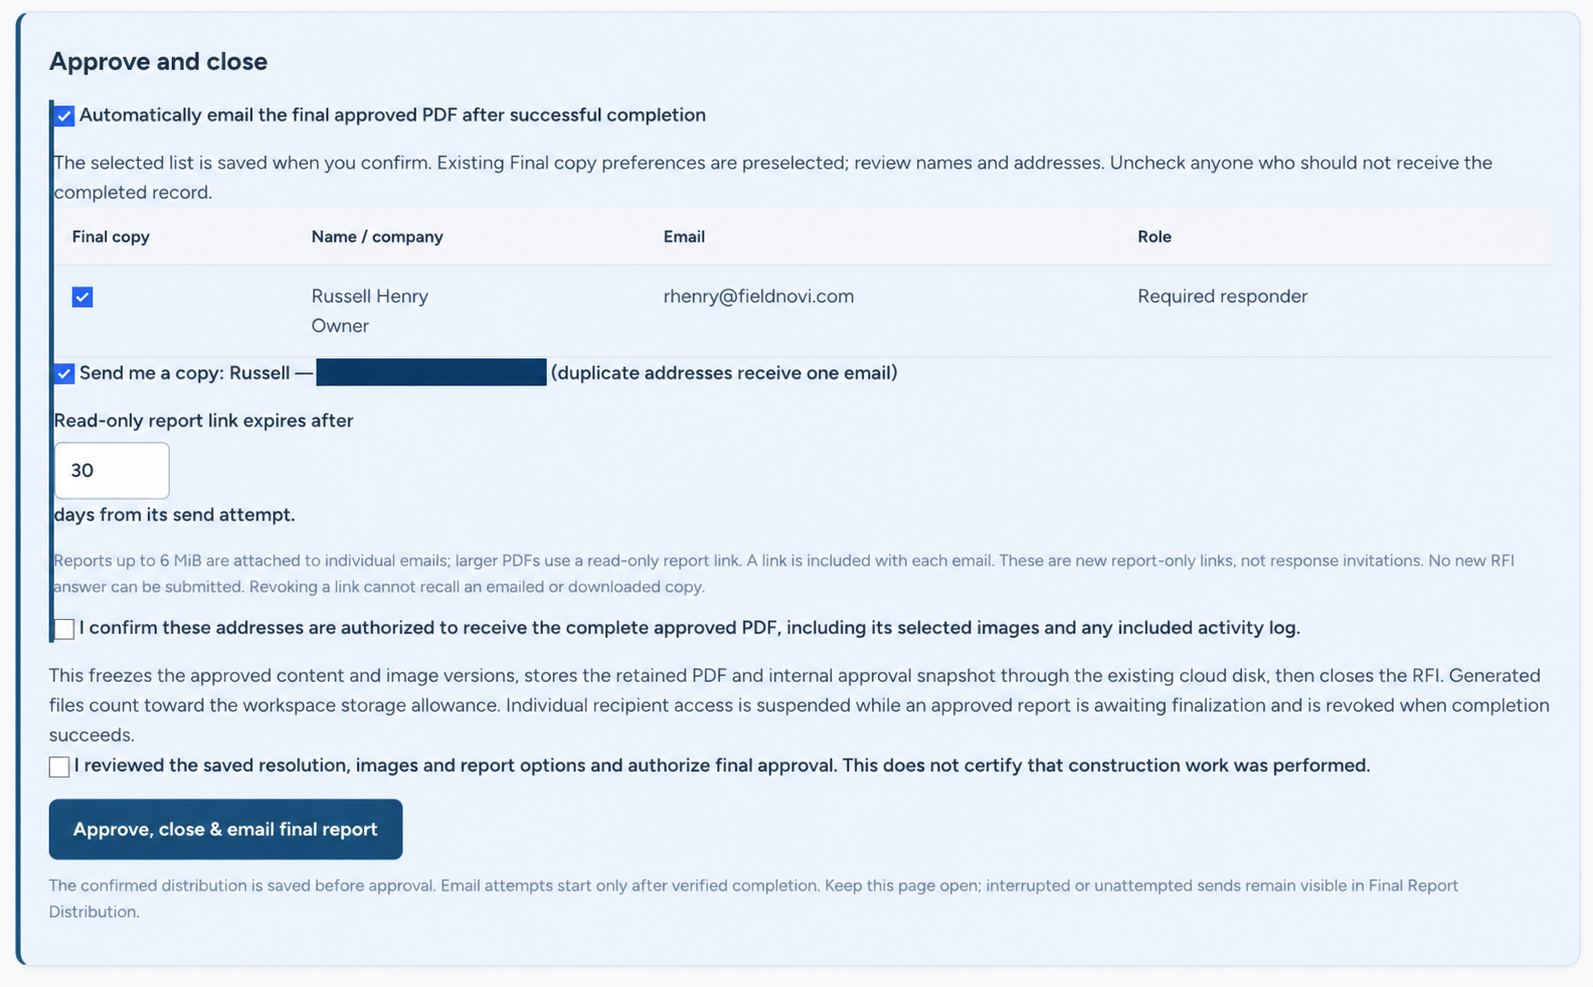
Helpful tip Accepting a response is separate from this final approval. Confirm the distribution list carefully before closing.
STEP 11 OF 13
Download and review the completed report
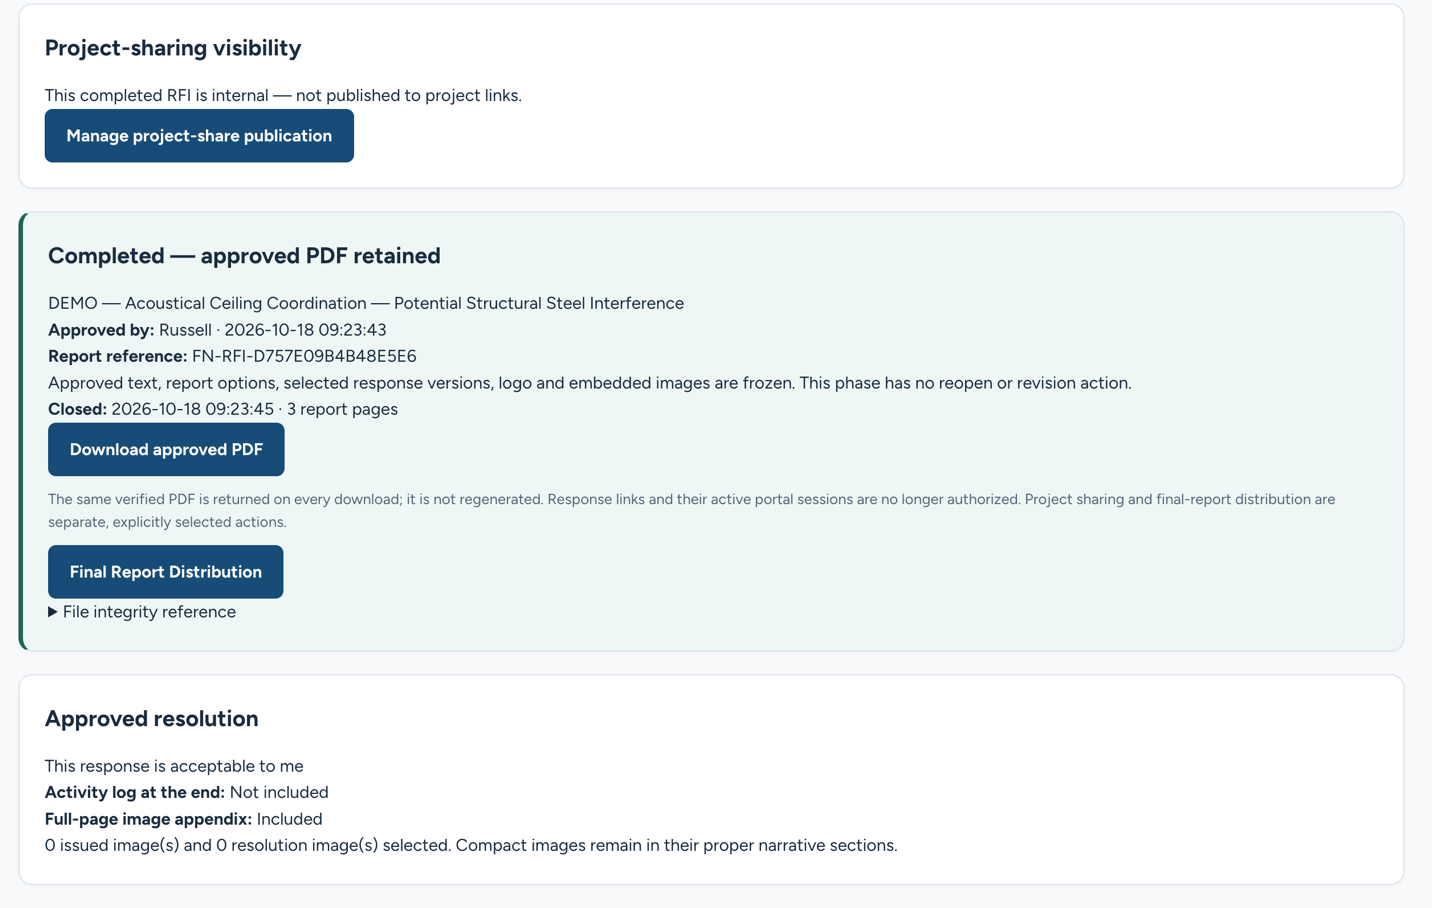
When the record shows Completed — approved PDF retained, select Download approved PDF to save the final report to your computer.
Open Final Report Distribution to review the email attempts, including any interrupted or unattempted sends. Downloads return the retained approved PDF rather than regenerating it.
Project-share publication is a separate action. The example completed RFI remains internal until its project-sharing visibility is explicitly managed.
STEP 12 OF 13
Open the RFI register and export a log
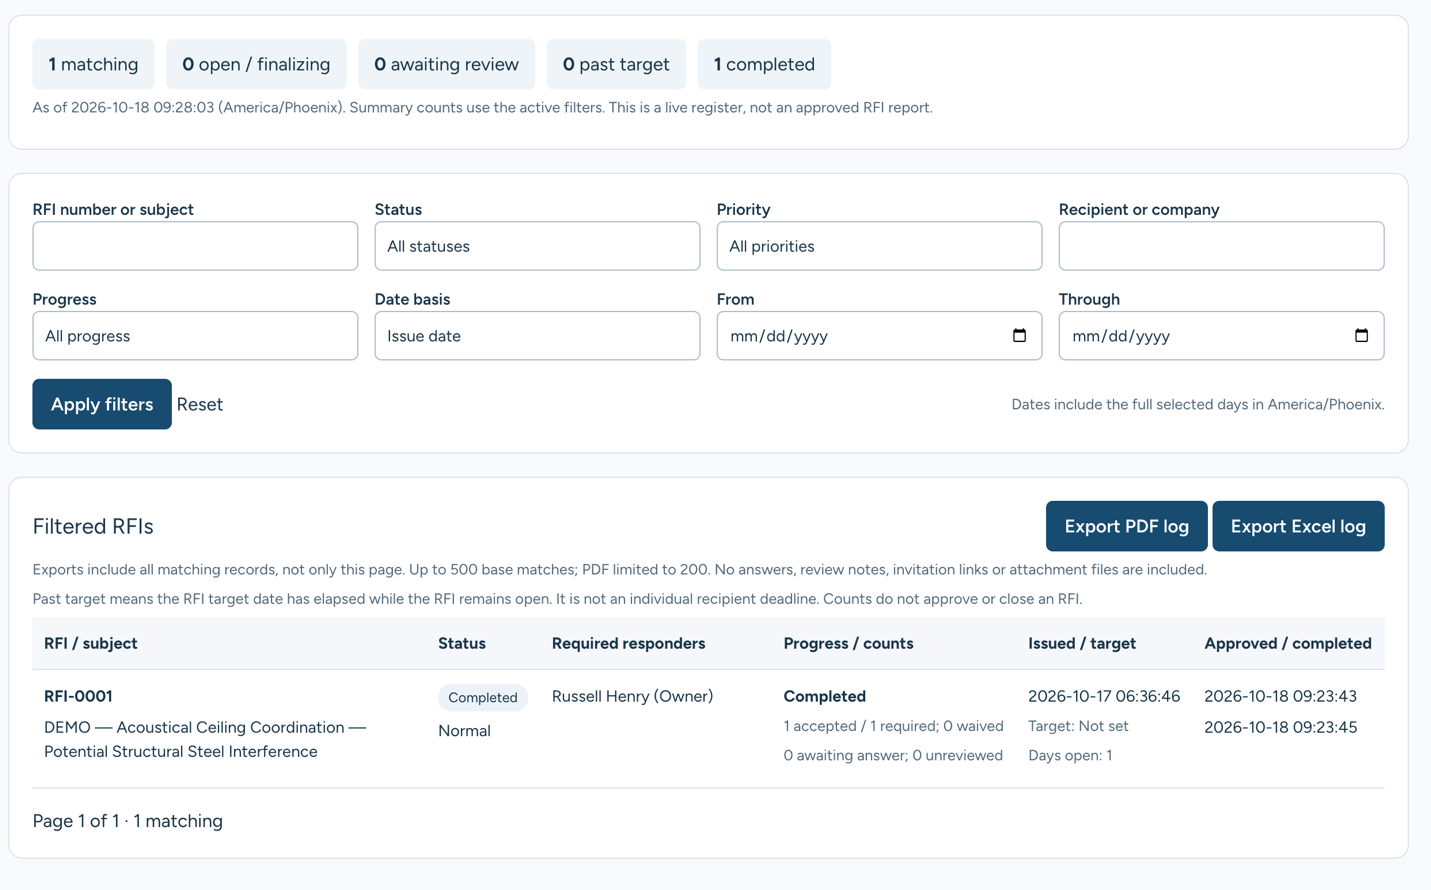
- From the project’s RFI screen, select Open project RFI register.
- Review the counts and use filters such as RFI number or subject, status, priority, recipient, progress and date range.
- Select Apply filters.
- Select Export PDF log or Export Excel log.
The export includes matching records, not just the current page. The shown register allows up to 500 matches per export, with PDF output limited to 200. Narrow the filters if you reach a limit.
The log summarizes the register. It does not include response text, review notes, invitation links or attachment files, and it does not replace an individual RFI’s approved PDF.

STEP 13 OF 13
Find RFIs from the search toolbar
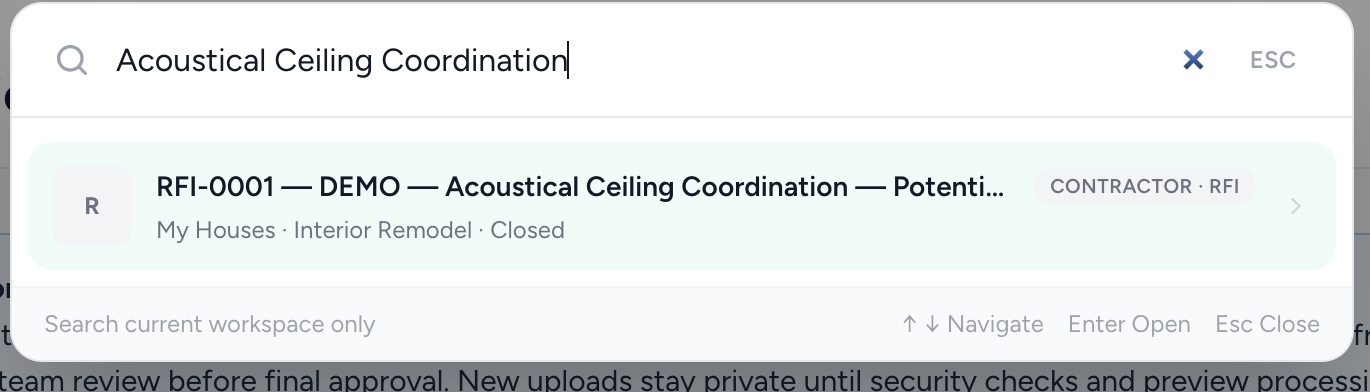
Open the search toolbar and enter a distinctive part of the RFI subject. Choose the matching CONTRACTOR · RFI result to open the record.
Search applies to the current workspace. If the expected RFI is missing, check the workspace you are using and try a shorter part of its subject.
GOOD HABITS
Best practices
- Write a focused subject and a specific question so the reviewer knows what decision or clarification you need.
- Save before leaving a form. Wait for image processing and save markup versions before selecting them for sharing.
- Review the issued image selection and each recipient’s role before confirming the question.
- Keep individual invitation links private and use the portal for responses.
- Review all submitted answers and meet the response requirements before final approval.
- Preview the report, selected image versions and final-copy list before closing.
- Use the approved PDF for a completed RFI and the filtered register export for project-wide tracking.
QUICK ANSWERS
Common questions
Do recipients need a FieldNovi login?
No. They open their individual invitation and continue to the RFI response portal. Their link is private and grants access only to the assigned RFI.
Does saving an RFI automatically send invitations?
No. Save the details and recipients, confirm the issued question, then select Send RFI invitations and confirm the send. Preparing invitations alone does not email anyone.
What if I already know the solution?
Choose Enter an existing solution in Step 1 to record the known answer and close without response invitations. Choose the workflow carefully because it cannot change after issue or saved report selections.
Why is my image not ready for markup or sharing?
New images stay private while security checks and preview processing complete. Refresh the page to check progress, and wait until the image is ready before sharing or opening markup.
Will markup replace my original image?
No. FieldNovi retains the original and saves new markup versions. Use the version history to view or reopen a version, or return to the original.
Does accepting a response close the RFI?
No. It records the answer as accepted for resolution. Review the final resolution and report in Step 5, then complete final approval and closure in Step 6.
Can recipients reply to the email or upload a PDF as their response?
Responses must be submitted through the portal. The current response form supports written text and up to three JPEG, PNG or WebP images; it does not support PDF uploads or recipient-side markup.
Can I reopen a completed RFI?
The completed workflow shown here has no reopen or revision action. Final approval freezes the retained report and its selected content, so review the draft carefully before closing.
What is the difference between the final PDF and the RFI log?
The approved PDF is the retained report for one completed RFI. The PDF or Excel log summarizes matching entries in the project register and excludes response text, review notes, invitation links and attachment files.
FIELDNOVI SUPPORT
Still need help?
Email support@fieldnovi.com for questions or anything that is not working as expected.
Include these details
- Your name and organization.
- The workspace and any relevant record names.
- What you were trying to do and what happened instead.
- Any error message and a screenshot, when possible.
- The approximate date and time the issue occurred.
Do not include passwords or payment card details.